vue3.x 和 vue2.x的一些区别
后面的讲解都是使用的vue3.x 使用了setup语法糖,这个语法糖的确好用,不用每个都去return,实际开发中经常忘记return,这个语法糖就很好用了,对于setup语法糖是3.2才支持的。
主要讲解我们开发中经常用到的一些内容,包括 router,prototype,父子组件调用 等。
vue3.x组合式api
vue2 定义属性和方法
<template>
  <div>
    <div>简单属性</div>
    <div>{{ msg }}</div>
    <div><button @click="updateMsg">修改马杀鸡</button></div>

    <div>对象属性</div>
    <div>{{ ObjMsg.msg }}</div>
    <div><button @click="updateObjMsg">修改对象马杀鸡</button></div>
  </div>
</template>

<script>
export default {
  data() {
    return {
      msg: "我是马杀鸡",
      ObjMsg: {
        msg: "我是对象马杀鸡",
      },
    };
  },
  methods: {
    updateMsg() {
      this.msg = "我是马杀鸡修改后的内容";
    },
    updateObjMsg() {
      this.ObjMsg.msg = "我是对象马杀鸡修改后的内容";
    },
  },
};
</script>

<style scoped>
</style>
vue3 定义属性和方法
<template>
  <div>
    <div>简单属性</div>
    <div>{{ msg }}</div>
    <div><button @click="updateMsg">修改马杀鸡</button></div>

    <div>对象属性</div>
    <div>{{ ObjMsg.msg }}</div>
    <div><button @click="updateObjMsg">修改对象马杀鸡</button></div>
  </div>
</template>

<script setup>
//注意要导入 reactive和ref
import { reactive, ref } from "vue";

//只是基本数据类型相关操作块
const msg = ref("我是马杀鸡");
const updateMsg = () => {
  msg.value = "我是马杀鸡修改后的内容";
};

//这是对象数据类型相关操作
const ObjMsg = reactive({
  msg: "我是对象马杀鸡",
});
const updateObjMsg = () => {
  ObjMsg.msg = "我是对象马杀鸡修改后的内容";
};
</script>

<style scoped>
</style>
官方建议简单类型使用 ref,对象类型使用reactive,reactive最终也是转为ref的,那么上面对象类型也可以这么写
const ObjMsg = ref({
  msg: "我是对象马杀鸡",
});
const updateObjMsg = () => {
  ObjMsg.value.msg = "我是对象马杀鸡修改后的内容";
};
操作的时候需要带上value,这个就看个人习惯了,都用ref也是没有问题的
可以看出 vue3 的组合式api,可以将逻辑块写在一起,vue2,属性定义和逻辑代码是分开的,不利于维护。
router 使用的区别
vue2.x router使用
vue2使用的router是3.x
定义router
import Vue from 'vue'
import VueRouter from 'vue-router'

Vue.use(VueRouter)

const routes = [
  {
    name: '首页',
    path: '/home',
    component: () => import('../views/Home.vue'),
  }
];

const router = new VueRouter({
  mode: 'history',
  routes
})

export default router
在main.js中引入router
import router from './router'

Vue.config.productionTip = false

new Vue({
  router,
  render: h => h(App)
}).$mount('#app')
在vue中使用
export default {
  data() {
    return {};
  },
  created() {
    console.log("当前路由", this.$route.path);
    console.log("过五秒后跳转到home");
    setTimeout(() => {
      this.$router.push("home");
    }, 5000);
  },
};
直接使用this.$route 和 this.$router 就可以直接调用,比较方便
vue3.x使用router
vue3.x使用的router版本4.x
定义router
import { createRouter, createWebHistory } from 'vue-router'
const routes = [
    {
        name: '首页',
        path: '/home',
        component: () => import('../views/Home.vue'),
    }
];

//这里不是通过new来创建,通过createRouter 方法创建,使用的模式不是通过mode来定义
const router = createRouter({
    routes,
    history: createWebHistory(),
})

export default router
在main.js中引用
import router from './router/router'
createApp(App).use(router).mount('#app')
在vue中使用router
<script setup>
import { useRoute, useRouter } from "vue-router";
const router = useRouter();
const route = useRoute();
const init = () => {
  console.log("当前路由", route.path);
  console.log("过五秒后跳转到home");
  setTimeout(() => {
    router.push("home");
  }, 5000);
};
init();
</script>
使用相比vue2麻烦一些,需要先引入,然后获取router,route对象,vue3不能通过this获取vue对象了。
总结:
vue2.x 通过this.router this.route直接调用
vue3.x 需要引入useRoute,useRouter 通过useRouter()和useRoute() 方法获取相关对象,然后调用
定义全局方法,变量
vue2.x定义全局方法
main.js
import Vue from 'vue'
import App from './App.vue'
import router from './router'

Vue.config.productionTip = false

const Utils = {
  isEmpty: (value) => {
    if (value === null || value === undefined || value.trim() === "") {
      return true
    }
    return false;
  }
}

Vue.prototype.Utils = Utils;

new Vue({
  router,
  render: h => h(App)
}).$mount('#app')
vue2.x中使用全局方法
<script>
export default {
  data() {
    return {};
  },
  created() {
    let test = " ";
    console.log("调用全局为空判断", this.Utils.isEmpty(test));
  },
};
</script>
输出结果:调用全局为空判断 true
vue2中可以使用原生类型扩展vue对象,然后通过this直接调用
vue3.x定义全局方法
main.js
import { createApp } from 'vue'
import App from './App.vue'
import router from './router/router'


const Utils = {
    isEmpty: (value) => {
        if (value === null || value === undefined || value.trim() === "") {
            return true
        }
        return false;
    }
}

const app = createApp(App);
app.config.globalProperties.Utils = Utils;

app.use(router)
app.mount('#app')
vue3.x中使用全局方法
<script setup>
import { getCurrentInstance } from "vue";
const { proxy } = getCurrentInstance();
const init = () => {
  let test = " ";
  console.log("调用全局为空判断", proxy.Utils.isEmpty(test));
};

init();
</script>

输出结果:调用全局为空判断 true
vue3 是通过代理获取全局对象,所以在使用的时候需要通过getCurrentInstance 方法获取当前实例,然后调用
总结
vue2.x通过prototype原生类扩展属性,通过this.xxx调用
vue3.x 通过app.config.globalProperties 定义全局方法,通过getCurrentInstance 获取当前对象,然后调用
父子组件调用
vue2.x 父组件调用子组件
定义子组件
<template>
  <div :style="{ border: '1px solid red' }">
    <div>这里展示的是父组件传过来的参数:{{ msg }}</div>
    <div>这里展示的是父组件调用子组件方法修改的参数:{{ msg2 }}</div>
  </div>
</template>

<script>
export default {
  props: {
    msg: String,
  },
  data() {
    return {
      msg2: "",
    };
  },
  methods: {
    changeMsg2(msg) {
      this.msg2 = msg;
    },
  },
};
</script>

<style scoped>
</style>
通过props定义参数,同时定义了一个changeMsg2的方法,提供父组件调用
定义父组件
<template>
  <div>
    <Son ref="refSon" :msg="msg"></Son>
    <button @click="opSonMethod">调用子组件中的方法</button>
  </div>
</template>

<script>
import Son from "./ParentSon.vue";
export default {
  components: {
    Son,
  },
  data() {
    return {
      msg: "我是父组件传到子组件的参数",
      sonParams: "",
    };
  },
  methods: {
    opSonMethod() {
      this.$refs.refSon.changeMsg2("我是父组件调用子组件方法传过来的参数");
    },
  },
};
</script>

父组件运行起来的效果,红框中的内容就是子组件
传入参数 msg,同时定义子组件的ref,父组件通过this.$refs.refSon 找到子组件,然后调用子组件的方法
点击按钮后的效果
 !
!
看到,子组件显示了父组件传入的方法参数
这是父组件调用子组件
vue2.x子组件调用父组件
定义子组件
我们继续使用上面的组件
<template>
  <div :style="{ border: '1px solid red' }">
    <div>这里展示的是父组件传过来的参数:{{ msg }}</div>
    <div>这里展示的是父组件调用子组件方法修改的参数:{{ msg2 }}</div>
    <button @click="opParentMethod">
      我是子组件中的按钮,我来调用父组件的方法
    </button>
  </div>
</template>

<script>
export default {
  props: {
    msg: String,
  },
  data() {
    return {
      msg2: "",
    };
  },
  methods: {
    changeMsg2(msg) {
      this.msg2 = msg;
    },
    opParentMethod() {
      this.$emit("opParent", "我是子组件调用父组件传入的参数");
    },
  },
};
</script>

<style scoped>
</style>
这里子组件定义了一个按钮,来调用父组件的opParent
定义父组件
<template>
  <div>
    <Son ref="refSon" :msg="msg" @opParent="myParentMethod"></Son>
    <button @click="opSonMethod">调用子组件中的方法</button>
    <div>展示子组件传入的方法参数:{{ sonParams }}</div>
  </div>
</template>

<script>
import Son from "./ParentSon.vue";
export default {
  components: {
    Son,
  },
  data() {
    return {
      msg: "我是父组件传到子组件的参数",
      sonParams: "",
    };
  },
  methods: {
    opSonMethod() {
      this.$refs.refSon.changeMsg2("我是父组件调用子组件方法传过来的参数");
    },
    myParentMethod(e) {
      this.sonParams = e;
    },
  },
};
</script>
在调用的父组件中定义 @opParent 这里的名字要和子组件中的 this.$emit(“opParent”, “我是子组件调用父组件传入的参数”); emit里面的方法名一样
然后定义opParent要调用的方法,这样点击子组件的按钮就可以直接调用父组件的方法了。
点击子组件中的按钮,运行效果

总结:父组件通过ref调用子组件中的方法 子组件通过this.$emit()调用父组件方法
vue3.x父组件调用子组件
定义子组件
<template>
  <div :style="{ border: '1px solid red' }">
    <div>这里展示的是父组件传过来的参数:{{ msg }}</div>
    <div>这里展示的是父组件调用子组件方法修改的参数:{{ msg2 }}</div>
    <button @click="opParentMethod">
      我是子组件中的按钮,我来调用父组件的方法
    </button>
  </div>
</template>

<script setup>
import { ref } from "vue";
const props = defineProps({
  msg: String,
});

const msg2 = ref();
const changeMsg2 = (msg) => {
  msg2.value = msg;
};

defineExpose({
  changeMsg2,
});
</script>
定义props 方式跟vue2不一样,需要对外的方法要使用 defineExpose 对外,否则 父组件无法调用
定义父组件
<template>
  <div>
    <Son ref="refSon" :msg="msg"></Son>
    <button @click="opSonMethod">调用子组件中的方法</button>
  </div>
</template>

<script setup>
import Son from "./ParentSon.vue";
import { ref } from "vue";

const refSon = ref();
const msg = ref("我是父组件传到子组件的参数");
const opSonMethod = () => {
  refSon.value.changeMsg2("我是父组件调用子组件方法传过来的参数");
};
</script>
调用子组件不能使用this.$refs了,需要先在html中定义ref,然后在js中定义同名的ref()对象,然后通过ref对象的.value调用
vue3.x子组件调用父组件
定义子组件
<template>
  <div :style="{ border: '1px solid red' }">
    <button @click="opParentMethod">
      我是子组件中的按钮,我来调用父组件的方法
    </button>
  </div>
</template>

<script setup>
import { ref,defineExpose } from "vue";
const emit = defineEmits();
const props = defineProps({
  msg: {
    type: String,
    defualt: ""
  }
})
const msg2 = ref("");

const opParentMethod = () => {
  emit("opParent", "我是子组件调用父组件传入的参数");
};
</script>

//父组件调用子组件的方法
const changeMsg2 = (msg) => {
  msg2.value = msg
}

defineExpose({
  changeMsg2
})
这里不能使用this.$emit()直接调用,需要先通过defineEmits() 获取emit对象,然后调用
定义父组件
<template>
  <div>
    <Son @opParent="myParentMethod"></Son>
    <div>展示子组件传入的方法参数:{{ sonParams }}</div>
  </div>
</template>

<script setup>
import Son from "./ParentSon.vue";
import { ref } from "vue";

const sonParams = ref();

const myParentMethod = (e) => {
  sonParams.value = e;
};
</script>
运行效果

父组件跟vue2.x 没啥区别,定义方法,调用即可。
总结:vue2.x和vue3.x 父子组件调用
vue2.x 引入子组件,然后定义在components中直接通过 props定义子组件参数,通过this.$emit()调用父组件方法,父组件直接通过this.$refs.ref 调用子组件方法
vue3.x 引入子组建后,直接使用,子组件参数需要定义在defineProps 中,子组件方法要通过 defineExpose导出父组件才能调用,子组件调用defineEmits()获取emit对象调用父组件 父组件通过定义const xxx=ref() 来定义ref组件的引用,然后通过对象来调用子组件
watch的使用
vue2.x使用watch
<template>
  <div>
    <div>需要监听的值:{{ msg }}</div>
    <button @click="changeMsg">修改值</button>
  </div>
</template>

<script>
export default {
  data() {
    return {
      msg: "123456",
    };
  },
  methods: {
    changeMsg() {
      this.msg = new Date().getTime();
    },
  },
  watch: {
    msg: {
      immediate: true,
      deep: false,
      handler(newValue, oldValue) {
        console.log("watch,oldValue:" + oldValue + ",newValue:" + newValue);
      },
    },
  },
};
</script>
我们点击按钮,控制台可以输出监听值的变化
vue3.x使用watch
<template>
  <div>
    <div>需要监听的值:{{ msg }}</div>
    <button @click="changeMsg">修改值</button>
  </div>
</template>

<script setup>
import { ref, watch } from "vue";
const msg = ref("123456");
const changeMsg = () => {
  msg.value = new Date().getTime();
};
//监听单个
watch(
  msg,
  (newValue, oldValue) => {
    console.log("监听单个watch,oldValue:" + oldValue + ",newValue:" + newValue);
  },
  { immediate: true, deep: false }
);
//监听多个
watch(
  [msg, msg],
  (newMsg, oldMsg) => {
    console.log("监听多个watch,newMsg:" + newMsg + ",oldMsg:" + oldMsg);
  },
  { immediate: true, deep: false }
);
//此时 newMsg 和oldMsg是数组
</script>
需要先引入watch,而且监听的值,需要先定义,否则报错
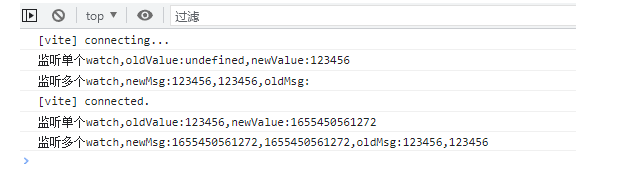
监听多个,newMsg 和 oldMsg 都为数组
生命周期
vue2.x生命周期
<template>
  <div>
    我是被修改的属性:{{ msg }}
    <button @click="updatePage">我来修改界面</button>
    <button @click="goHome">我要离开,触发一下destory</button>
  </div>
</template>

<script>
export default {
  data() {
    return {
      msg: "",
    };
  },
  methods: {
    updatePage() {
      this.msg = "我来修改界面";
    },
    goHome() {
      this.$router.push("/home");
    },
  },
  beforeCreate() {
    console.log("我是beforeCreate");
  },
  created() {
    console.log("我是created");
  },
  beforeMount() {
    console.log("beforeMount");
  },
  mounted() {
    console.log("mounted");
  },
  beforeUpdate() {
    console.log("beforeUpdate");
  },
  updated() {
    console.log("updated");
  },
  beforeDestroy() {
    console.log("beforeDestroy");
  },
  destroyed() {
    console.log("destroyed");
  },
};
</script>

<style lang="scss" scoped>
</style>
vue3.x生命周期
<template>
  <div>
    我是被修改的属性:{{ msg }}
    <button @click="updatePage">我来修改界面</button>
    <button @click="goHome">我要离开,触发一下destory</button>
  </div>
</template>

<script setup>
import {
  onBeforeMount,
  onBeforeUnmount,
  onBeforeUpdate,
  onMounted,
  onUnmounted,
  onUpdated,
} from "@vue/runtime-core";
import { ref } from "vue";
import { useRouter } from "vue-router";
const router = useRouter();

const msg = ref("");

const updatePage = () => {
  msg.value = "我来修改界面";
};

const goHome = () => {
  router.push("/home");
};

const init = () => {
  console.log("我是页面初始化的方法");
};
init();

onBeforeMount(() => {
  console.log("beforeMount");
});
onMounted(() => {
  console.log("mounted");
});
onBeforeUpdate(() => {
  console.log("onBeforeUpdate");
});
onUpdated(() => {
  console.log("onUpdated");
});
onBeforeUnmount(() => {
  console.log("onBeforeUnmount");
});
onUnmounted(() => {
  console.log("onUnmounted");
});
</script>

<style lang="scss" scoped>
</style>
vue3中没有 beforeCreate created 也没有 beforeDestory destroyed 使用 onBeforeUnmount onUnmounted来代替
根节点不同
vue2.x 再template中只能又一个根节点 vue3.x可以有多个跟节点
总结
以上就是目前我发现的vue2.x和vue3.x在使用上最大的几个变化。通过上面的例子可以看出,在使用一些常用方法的时候,vue2的确方便,直接使用this就可以调用,vue3.x需要引入后再调用,vue3是按需引入的。但是vue3.x是未来的趋势,而且性能方面vue3.x比vue2.x高很多。后续的一些ui框架,组件,工具,肯定会持续维护vue3.x版本,vue2.x基本就停止维护了,比如我们最常用的ui框架 element ui 就是活生生的例子。其实用习惯了也是一样,就跟最开始我觉得jquery也挺好,用习惯了vue,觉得vue还是香,目前我觉得vue2还是很香的,也许用一段时间我觉得vue3.x会比vue2.x香,大家一起学起来吧。